Wednesday, August 30, 2006

Five Things

Melissa of The Traveler’s Lunchbox has issued a daunting challenge to food bloggers, and Anna from Morsels & Musings has dared me to meet it. The challenge? To recommend five foods – and five foods only – that everyone should eat once before they die.

I quickly realized this task required much more than a simple bulleted list, for it wasn’t only food items vying for a spot on my top five, but the stories behind them. After all, much of a food’s value and significance comes from its personal meaning and societal context – the source of the ingredients or recipe, the location where you eat the food, how the food is eaten, and who you are eating it with. Sure, burritos are good, and everyone should eat one pre-Grim Reaper, but a guacamole burrito from Carrburritos in Carrboro, North Carolina, devoured after a year of living in Zimbabwe, where you can’t find black beans, Monterey Jack cheese or sour cream, is nothing short of divine. A Macoun apple plucked straight from the tree on a sparkling New England day, when the sound of biting into the apple is fall itself, crisp and bright, and you know you will eat four more in the car on the way home (after sampling some apple cider from the orchard shop), and that you will feel slightly ill, but, oh, oh will you be happy – that apple is nothing like the waxy mid-winter apple you toss into your basket at Stop & Shop.

What makes a particular food item memorable is different for every person. My “five things to eat before you die” will not make your list unless, after eating them, you, too, have a story to tell.

Milk from a cow. All you Louis Pasteur fans may not be with me on this one, but once you’ve had milk straight from the cow, you realize milk from a carton is a totally different species. It’s like one version should be called cow milk, and one should be called store milk. Where does store milk come from? The store. Where does cow milk come from? The cow. And you know this because cow milk tastes, well, slightly cow-y, and it is warm because, well, it has just been inside the cow, and it is creamy because it has all the fat the cows put there naturally. Try some.

Custard apple with blue cheese. Do you ever wonder how certain food combinations came to be? Who was the first person who tried popcorn with butter? Peanut butter and jelly? Rice and beans? Muesli with yogurt? Well, I can tell you exactly how this food combination, soon to take the world by storm, was created. One Saturday morning in Brisbane, Australia, Mark and I had just purchased Danish blue cheese at Delta Continental and custard apples at the Green Flea Market and we wanted to eat them both immediately. We put the pair together on a plate, and the flavor combination made our taste buds dance for joy. The dry, sharpness of the crumbly cheese, the intense sweetness of the syrupy-soft custard apple – it was something to behold. And behold again. And again.

An ice cream cone at Maple View Farms in Chapel Hill, North Carolina. Lick your cone while lazily swaying back and forth on your wooden rocking chair, gazing over the field where the cows who contributed to your happiness graze and chew their cud. To make the homemade ice cream taste even better, go to Maple View on the day before your wedding, and have your husband-to-be read from a list he has written of all the reasons he wants to spend the rest of his life with you, making the next day’s courthouse ceremony more special than any limousine and white dress affair you could ever imagine. Pick any ice cream flavor you want; trust me, it won’t matter.

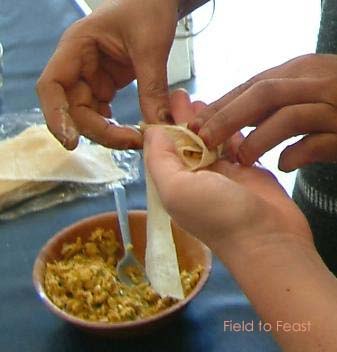
Jiao.zi. I am not much of a window shopper when it comes to clothes, but if it is roadside food vying to catch my eye – watch out. If you feel similarly, then you, too, should spend a few months living in China. I remember with nostalgia walking down the street, snacking as I went. Peer into the coal-burning metal barrel of the sweet potato vendor and select your tin-foiled tuber. Bargain for that perfectly ripe Asian pear. Ignore the huge quantity of oil the stir-fry man pours into his sidewalk wok, and pick out your favorite ingredients. To top it off, look for the towering stack of bamboo steamers and buy some vegetable jiao.zi. Jizo.zi are like small gift parcels: a thin skin of dough artfully twisted around a dollop of sautéed veggies. I forget almost every Chinese word I ever learned, but there is one thing I can still say: hěn hǎo chī.

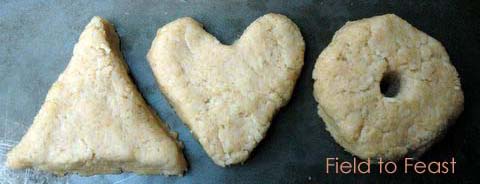
Your grandmother’s cookies, made by you. If you somehow escaped growing up without eating your grandmother’s cookies – or if you ate her cookies by the fistful, but never asked for the recipe – go digging through that dusty recipe box she left you and get baking, tout suite. That way, when your grandchildren start cooking on their own, you can supply them with their great-great grandmother’s cookie recipe. And that will be a very special thing. (The cookies won’t taste nearly as good as when your grandmother made them, but luckily your grandkids won’t know that.) Already stock your grandmother’s cookies in your cookie jar? Start asking friends for their grandmothers’ recipes. Soon, you will have a collection of the best cookie recipes ever. Here’s my contribution, just to get you started:

Nana’s Molasses Cookies

¾ cup vegetable shortening
1 cup sugar
¼ cup molasses
1 egg
2 teaspoons baking soda
2 cups flour
½ teaspoon ground cloves
½ teaspoon ground ginger
1 teaspoon cinnamon
½ teaspoon salt

Beat together the shortening, sugar, molasses and egg in a medium bowl. In a separate bowl, sift together all of the dry ingredients. Combine the dry and wet ingredients and mix well. Mould the batter into 1-inch diameter balls and roll them in the extra sugar. Place the balls on a greased cookie sheet, 2 inches apart. Bake at 375 degrees F for 8-10 minutes.

Check out Anna’s top five here (and take a gander at her innovative “recipe carousel” posts while you are at it). Have a list of your own? Share it in a comment! I am "tagging" two blogs to post their lists, if they haven't already: Julie from A Mingling of Tastes and A Mad Tea Party.

Saturday, August 26, 2006

Peanut Butter Perfection

Sparkling beaches; lush rainforest; stunningly-expansive outback; fresh tropical fruits; mild climate; friendly, “no worries, mate” people; an active, outdoor culture; Tim-Tams; sidewalk cafes perfect for flat-white sipping – Mark and I loved our two years living in Australia. In fact, we believe there is only one thing that keeps the world’s largest island from attaining absolute perfection – quality peanut butter.

Real peanut butter – the smooth, natural kind, flecked with dark brown, that sticks to the roof of your mouth – is nowhere to be found in Oz. My only explanation for this unfortunate oversight is that Aussies adore Vegemite, which fills a similar gastronomical niche. Instead of bringing PB&J to school, for example, children take Vegemite and butter sandwiches. However, to my mind, and the minds of any other people who have taste buds and live outside of Australia, Vegemite is a wholly deficient peanut butter substitute.

Zimbabwe, on the other hand, may not have beaches, rainforest, outback or Tim-Tams, but it produces the best peanut butter Mark and I have ever eaten. Our peanut butter brand of preference is Lyon’s. Whenever possible, however, we buy homemade peanut butter. Amidst this country’s faltering economy, many people operate informal home businesses in order to generate income, and peanut-butter making is one of the most popular. Everyone’s peanut butter tastes slightly different, and our favorites have a warm, round, roasted flavor. Peanuts (called “groundnuts” here) are a popular crop, and peanut butter is used in many dishes, including both a relish of peanut butter and greens and the subject of this post – mupunga ne dovi (rice with peanut butter).

I first spotted mupunga ne dovi on a colleague’s lunch plate, where it was sitting beside some meat relish. “Is that brown sadza?” I asked quizzically. Mercy laughed. “No,” she said, “It’s rice with peanut butter. You should try it.” I did, and I was hooked.

Rice with peanut butter is an exceedingly easy dish, and it tastes so good you will want to make it regularly as an afternoon snack or an accompaniment to a bowl of tomato or butternut soup. Following Dorothy’s suggestion, I make this dish using Malawi Rice, but any short-grain white rice will do.

Rice with Peanut Butter (Mupunga ne Dovi)
Makes one loaf

4 cups water
¼ teaspoon salt
1½ cups Malawi rice, rinsed
4 tablespoons peanut butter

Put the water and salt in a medium saucepan over high heat. Once the water is boiling, add the rice. Turn the heat down to medium, and cook at a vigorous simmer until the water is absorbed – about 20 minutes. Cover the pot, turn the heat to very low and cook for another ten minutes. The rice will be light and fluffy.

Add the peanut butter and stir for 4 minutes with a wooden spoon, mashing the rice against the side of the saucepan. If you were a Zimbabwean woman, you could probably do this stirring in half the time because of the years of practice (and strong arms) you have from making sadza. The mixture will get very thick.

Spoon the mixture onto a plate and form into a loaf. Once the loaf is cool, cut it into ¾-inch slices and serve.

After making this dish several times in a loaf shape, I realized other shapes would be possible, too. Cookie cutters would be the easiest way to make fun shapes. You also can use your hands, as I did, although your shapes will be much more rudimentary. If you have kids, give them the slightly-cooled peanut butter and rice mixture, and let them mould their own mupungu ne dovi sculptures. Rice has never been so fun. Now, if we could just introduce rice with peanut butter in Australia, perhaps peanut butter would finally win Aussies over. And the country itself? Well, it would finally attain perfection.

Wednesday, August 23, 2006

Wake Up! Your Rusks Are Ready

I was born in South Africa and am a cross between biscotti and a granola bar. Preparing me requires the patience demanded by meringues, along with the “no, don’t eat it yet” willpower of raw cookie dough. What am I?

Why a rusk, of course. Rusks are hard, dry biscuits – perfect for dipping in tea or coffee. This twice-baked breakfast staple is one food expatriate South Africans long for, and insist that visitors bring them. Tradition says rusks were invented by early travelers and explorers who needed foods that wouldn’t spoil.

In the rusk recipe below, the active steps are interspersed with periods of waiting while the dish bakes or cools. That means you’ll want to prepare rusks when you’ve already planned on spending a couple hours in the kitchen, or on a lazy weekend afternoon when you need to get up periodically to refill your lemonade anyway. As the title of this post suggests, the final product will not be ready until the following morning, after a night of drying in a barely-warm oven. Also, note that the original recipe uses milliliters and grams. I’ve converted the milliliters, but it’s best to use a kitchen scale to measure out the grams. Or, for approximate gram conversions, you can use this site as a resource.

Four-Seed Whole-Wheat Rusks
Adapted from Food and Home Entertaining, July 2002
Makes 48

500 grams whole-wheat flour
140 grams cake flour
5 milliliters / 1 teaspoon salt
30 milliliters / 2 tablespoons baking powder
200 grams treacle sugar (you can substitute molasses, or light or dark corn syrup)
250 grams butter, at room temperature
50 grams desiccated coconut
80 grams oats
80 grams sunflower seeds
30 grams poppy seeds
30 grams linseeds (a.k.a. flaxseeds)
50 grams sesame seeds
500 milliliters / 2 cups buttermilk
250 milliliters / 1 cup water
2 jumbo eggs, lightly beaten

Line a 39 x 32 x 4 centimeter (approx. 15 x 19 x 2 inch) baking tray with baking paper, and pre-heat your oven to 180 degrees Celsius (360 degrees Fahrenheit).

In a large bowl, sift together the whole-wheat flour, cake flour, salt and baking powder. If some bran husks remain in the bottom of your sifter, return them to the bowl. Add the treacle sugar, and stir. Dice the butter over the flour mixture and rub it in with your fingers. Then add the coconut, oats and all of the seeds, and mix well.

In a medium bowl, combine the buttermilk, water and eggs. Beat lightly with a fork, and add to the batter. Using a large metal spoon, gently fold in the liquid.

Spoon the dough into the prepared baking tray and cover with aluminum foil. Bake for 30 minutes at 180 degrees (360 F). Then, remove the foil and reduce the temperature to 160 degrees (320 F). Bake until a toothpick inserted in the middle comes out clean, about 30-40 minutes.

Remove the tray from the oven and cool completely. This step requires substantial willpower because what you have in front of you looks and tastes like a bran muffin cake. Write “bran muffins” down on your list of things to bake next weekend, and leave the poor rusks-to-be alone.

The next step is to cut the tempting muffin cake into 8 x 3 centimeter (approx. 3 x 1 inch) rectangles. You can do this while it is still in the tray, or you can turn the cake out onto a solid surface. Arrange the rectangles on oven racks, spaced slightly apart so that the dry, barely-warm air can circulate. Dry overnight for 12 hours at 50-60 degrees (130-140 F), keeping the oven door closed.

Open the door in the morning, and admire your rusks for a moment. They should be very dry and dense. Serve with your wake-up tea or coffee. Cool and store the remaining rusks in an airtight container. They will keep for weeks.

What a better way to start your day?

Saturday, August 19, 2006

A Drink, Tall and Gingery

Stoney is back!” Mark shouted with glee from the other end of the supermarket aisle. I abandoned our cart, rushed to the refrigerated section, and saw that it was true. There, resting innocuously behind the refrigerator door were rows and rows of our favorite soda – Stoney Ginger Beer.

Like fuel, bread and sugar, soda is prone to shortages in Zimbabwe. In fact, one month last year, soda disappeared from store shelves entirely. So we weren’t surprised when Stoney vanished several weeks ago. We just hoped its return would be imminent.

Stoney was introduced in South Africa in 1971, and is now one of Coca-Cola’s more than 400 brands. Ginger beer itself has a much longer history. The drink was first brewed in England in the 1700s, and contained a considerable amount of alcohol. It is traditionally made by using a “ginger beer plant” – not a plant at all, but an ever-growing mixture of microorganisms that produce carbon dioxide and alcohol. Today, mass-produced ginger beer like Stoney or Bundaberg is carbonated without fermentation, so it is non-alcoholic. Unlike its close cousin ginger ale, ginger beer is typically cloudy.

The Stoney Ginger Beer we drink is bottled in Harare. Yes, I said BOTTLED. Almost all soda here comes in actual glass bottles, which you later return for a refund. The bottles that contain Stoney do double duty – Stoney’s old-timey label is on one side, and the label for a hideous chartreuse drink called Sparletta is on the reverse. Woe to the person who thinks they spot Stoney at the store, only to discover it is the dreaded Sparletta.

On a “ginger-bite” scale from Schweppes to hot Blenheim Ginger Ale, Stoney is a 7. Stoney won’t clear your sinuses like a sip of Blenheim, but it is much more drinkable and has a very satisfactory ginger tang. Although Stoney does not need any accompaniments, today I decided to celebrate its return to our refrigerator by testing a recipe I spotted in Food and Home Entertaining. I didn’t think it was possible, but this gingerade is even more refreshing than Stoney solo.

Gingerade
Adapted from Food and Home Entertaining, May 2006
Serves 4 (or 2 very thirsty people)

500 milliliters / 2 cups ginger beer, chilled
500 milliliters / 2 cups peach (or apricot) juice, chilled
Juice of half a fresh lime (or lemon)
150 milliliters / 2/3 cup brandy (optional)
Ice

In a pitcher, combine the ginger beer, juices and brandy. Stir to combine. Add a handful of ice cubes and serve immediately.

For those of you who live outside of southern Africa…well, you are far, far away from Stoney Ginger Beer. In the States, try to make this drink with Blenheim’s mild ginger ale. If you must use a standard ginger ale (like Schweppes or Canada Dry), try amplifying the ginger flavor by adding some shavings of fresh ginger.

Tuesday, August 15, 2006

Tiger Fish: From River to Plate

My husband, Mark, eats no beef, chicken or pork and has spent years saving (rather than squishing) spiders, flies and sundry insects by carefully escorting them from inside the house to outside the house. This past weekend, he lost all this positive karma in a two-hour span of fishing on the Zambezi River near Mana Pools National Park in northern Zimbabwe. It was worth it.

Fishing is not a pastime that usually appeals to me, but that afternoon the river was particularly inviting and fishing seemed like a good way to experience it. Once afloat, we saw crocodiles and hippopotamuses plying the shoreline – the crocs impressing us with their stealth, their terror-inducing incisors, and their armor-like scales, and the hippos punctuating the stillness with a ruckus of guffaw-like honks. Saddle-bill storks waded in the tall grasses, white-fronted bee-eaters flitted in and out of their riverbank nests, and a fish eagle manned his treetop look-out. On the Zambian side of the river, this scene was framed by the Zambezi Escarpment, a picturesque row of small mountains.

Although neither of us had cast a line for many years, Mark hauled in two fish, including a tiger fishone of the most sought-after catches in the Zambezi, largely because of the challenge of reeling it in. Tiger fish are fighters – once hooked, only one in ten are brought onto the boat. Mark and I had several “ones that got away” before he perfected the balance of pulling and reeling, and, in thirty seconds of action-packed drama, caught a four-pounder. The fish was silver, with dotted black lines down its body and a peach-colored tint to its fins and tail. Its sharp, fierce-looking teeth presented a very intimidating appearance. (The literal translation of the fish’s scientific name, Hydrocyon vittatus, is “striped water dog.”) For breeding purposes, female tiger fish are typically thrown back into the river, but Mark’s catch was male and sizeable enough to save for a pre-dinner snack.

Tiger fish is a white fish that tastes similar to bream (a.k.a. tilapia). It is much bonier than bream, however, which means it isn’t very conducive for serving whole or as a filet. The camp chef skillfully prepared Mark’s fish by cutting it into small boneless pieces and frying these pieces in a thick batter. He served the tiger fish nuggets on lettuce, with slices of lemon and tomato. They were gobbled up before I had the chance to take a photo. Apparently, tiger fish is also excellent when pickled.

While we were nibbling on tiger fish, what were the other animals at Mana Pools eating? Well, the elephants were snacking on “elephant cookies,” otherwise known as seed pods of the apple-ring thorn tree. Members of the antelope family were enjoying leaves from the Natal mahogany, which was beginning to flower and smelled like honey. The lions were resting in the shade, so it is likely they had recently gorged on something big like a buffalo. And, how about the crocs? Well, thankfully they weren’t munching on anyone in our party.

Friday, August 11, 2006

North African Salad, Yankee Sensibility

There are three magazines I remember reading during my childhood: Ranger Rick, Yankee and Consumer Reports. The former was the one I was supposed to be reading, of course, but adults can’t keep anything out of the hands of a bookworm.

My favorite part of Yankee was its tidbits of home-spun, practical advice, typically aimed at pinching pennies or improving the quality of one’s sewing, knitting, bee-keeping or wood-working. I clearly remember one issue (circa 1988, is my guess) that described how to slice open a nearly-empty toothpaste tube in order to retrieve the last bit of paste. Otherwise, you were destined to forever forfeit that half-gram, no matter how assiduous your nightly tube rolling-and-squeezing regimen.

Consumer Reports, meanwhile, appealed to me for its scientific rigor and straightforward, confidence inspiring rating system. In fact, I felt that before my family purchased any item, we should first check Consumer Reports to guarantee we were making the best possible decision. (Okay, so I was a strange child. And I won’t even talk about my obsession with the L.L. Bean catalog).

I tell you all this because it explains why, as an adult who loves to cook, I am obsessed with Cook’s Illustrated. Cook’s Illustrated is sensible, frank and reliable, and exudes a certain Puritan minimalism that lets you know it is published in New England without even glancing at the masthead. Only one page per issue features photographs; all other images are hand-drawn, pen-and-ink illustrations. Two whole pages are dedicated to handy (and sometimes endearingly bizarre) tips submitted by readers, such as how to use a blow-drier to dry off berries (thanks, Phyllis Kirigin of Croton-on-Hudson, N.Y.) and how to employ a serrated knife to pluck test pasta strands from the pot (thanks, Isabelle Wolters of Scituate, Massachusetts).

In at least one article, Cook’s staff members present their results and recommendations from a meticulously-designed test of a certain prepared ingredient or piece of kitchenware. For example, it is because of Cook’s that I know Italian-made canned tomatoes have declined in quality since 1989 – the year when manufacturers began evading a new trade tariff by packing their tomatoes in puree rather than juice – and that a specialty tomato knife is a darn near useless piece of kitchen equipment.

Most importantly, when I am looking for a recipe that will not fail, I turn to Cook’s. So, as I mulled what new salad to attempt for Summer Salad Days (Winter Salad Days, for those of us in the Southern Hemisphere!), I logged onto the Cook’s Web site. Although the online version is not as ascetically aesthetically pleasing as the print version, it does have two distinct advantages – one, I can get my Cook’s fix anywhere in the world, and, two, the online recipes conveniently link to all related Cook’s tips. So, for example, I could link from the recipe below and discover exactly how to transform the salted nuts I had on hand into the unsalted nuts required for this recipe. (Blanch them for a minute in boiling water, then roast in a 350-degree oven until the liquid has evaporated – in case you were wondering.)

It was in Cook’s online database that I found this unique, refreshing salad recipe.

North African-style Dried Nectarine and Apple Salad
Adapted from Cook’s Illustrated
Makes about 4 cups

6 ounces (2 cups) dried nectarines, cut into 1/4-inch strips
¼ cup dry red wine
¼ cup warm water
1½ teaspoons grated fresh ginger
¼ teaspoon cayenne pepper
2 tablespoons lemon juice
2 tablespoons orange juice
2 tablespoons brown sugar
1½ teaspoons coriander seeds, toasted and ground
1½ teaspoons cumin seeds, toasted and ground
2 tart apples, sliced thin
¼ cup chopped, unsalted macadamia nuts, lightly toasted
2 tablespoons fresh cilantro leaves
Salt and ground black pepper

In medium bowl, re-hydrate peaches in wine and water for at least 15 minutes.

Meanwhile, mix the grated ginger, cayenne pepper, lemon juice, orange juice, brown sugar, coriander seeds and cumin seeds together in the bottom of a large bowl. Toss in the sliced apples, macadamia nuts and cilantro.

Add the peaches and their liquid, and toss again. Taste, and add salt and pepper to your liking (you won’t need much). Serve.

The most appealing thing about this dish is its mixture of textures and colors, and the heady taste and smell of those toasted seeds and grated ginger. If you would like a slightly more demure salad, try reducing the quantities of ginger, coriander seeds and cumin seeds to one teaspoon each.

Summer Salad Days is a food blog event thoughtfully hosted by My Life as a Reluctant Housewife.

Tuesday, August 08, 2006

Bo-Kaap’s Bounty

One thing I love about cities is that your own two feet can take you from downtown to uptown, from working-class pubs to hipster-filled martini bars, from thrift store alley to swank boutique street, from places of historical significance to present-day bastions of power, and from the Catholic festivals and canolis of the North End to the dim sum and dragons of Chinatown. That’s why, on a recent visit to Cape Town, I loved walking past the tall buildings and taxis of downtown, taking a right onto Wale Street, and strolling up the slope of Signal Hill into Bo-Kaap.

Bo-Kaap is the traditional home of the city’s Cape Malay community, the descendents of people from Indonesia, India and Sri Lanka whom the Dutch East India Company imprisoned as slaves in the late 1600s and early 1700s and brought to the Cape. This amalgamation of cultures produced its own cuisine and music, and contributed to the development of a lingua franca – Afrikaans. Bo-Kaap’s street fronts are stunning - think a pastel palette worthy of Miami Beach combined with elements of Cape Dutch architecture. The community is predominately Muslim, and the neighborhood boasts nine mosques.

Mark and I were particularly interested in learning about Cape Malay food, so we signed up for a half-day “cooking safari” with Andulela, a tour company devoted to responsible tourism that balances the needs of both visitors and communities. We’re not typically organized-tour people, but I had read a glowing review of this particular tour in Food and Home Entertaining, a beloved South African magazine, and it was the only aspect of our trip to Cape Town that we actually planned before our arrival.

Our tour began with a visit to the Bo-Kaap Museum and the community’s oldest mosque. Then we got down to business. Monique, Andulela’s cofounder, took us ingredient-shopping in the halaal butcheries and spice shops that dot the streets. We brought our bag-o-goodies to the home of a Cape Malay mother, and she regaled us with stories about her community as we helped her cook a bountiful feast. We ended the tour with a full belly, a packet of homemade masala, and a folder full of recipes. Here is one of them.

Dhal Curry with Squash
Serves 6
Adapted from Andulela

1½ cups brown lentils, picked over, thoroughly washed and soaked for at least an hour
¼ cup vegetable oil
2 large onions, chopped
2 cardamom pods
2 medium tomatoes, grated
2 green chilies, minced (remove seeds if you are spice-averse)
4 cloves garlic, crushed
1 teaspoon masala mix (such as garam masala)
1 teaspoon ground cumin
1 teaspoon ground coriander
½ teaspoon ground turmeric
3 cups water
1 teaspoon salt
3 gem squash (or whatever 1-pound of squash or pumpkin you have available), seeded, peeled and cut into small cubes
4 tablespoons cilantro leaves

Heat the oil over medium heat in a medium saucepan. Add the cardamom pods and let them sizzle for a few seconds. Then, add the onions. Cook for 5 minutes, or until the onions become soft. Add the tomatoes, chili, garlic and spices and simmer for another 8 minutes, stirring occasionally. Drain the lentils, and add them to the pan along with the 2 cups of water and the salt. Turn the heat down to medium-low and simmer.

After 30 minutes, add the squash and another cup of water. Continue to simmer for another 45 minutes, adding more water if necessary, until the lentils are soft and the squash is tender. Adjust salt, as needed, then garnish with the cilantro leaves and serve hot with rice or roti.

Sunday, August 06, 2006

Meticulously Moroccan

Last year, a friend and I took a series of cooking classes from Mariam, the Moroccan wife of one of my colleagues and an amazing chef. Mariam is a complete perfectionist, and everything perfect is Moroccan, so it was very hard for us to satisfy her exacting standards.

We took turns buying ingredients for our class, for example, and that week’s purchaser had to steel herself for Mariam’s inevitable criticisms. These criticisms always followed a predicable pattern: “You call this ground ginger [or any other ingredient]? Here, smell my ginger. From Morocco.”

One day I was particularly pleased with the olive oil I had found at the shops; it was reasonably priced and imported from Spain. Mariam’s niece opened the bottle and took a sniff – “Not bad,” she declared. Mariam drew the bottle to her nose, quickly put it down, strode over to her pantry and returned with another bottle. “This, this is olive oil,” she said, waving it under my nose. I smelled. It was, indeed, very, very fragrant. “Is it from Morocco?” I inquired, knowing full well the answer. “Yes, from the olive trees in my family’s garden. We pressed the oil ourselves, by hand.” It is difficult to compete with such olive oil.

Mariam’s cooking standards were also demanding – one week as I rolled out my dough to make m’semmen she said (approvingly?), “Ah, yes, even Carolyn can do this.” Despite the consistent blows to our egos, we loved every minute of class.

As far as I can tell, the secret to Moroccan cooking is three-fold – never measure, never set a timer and use twice as much paprika, cumin, black pepper and olive oil (preferably all sourced from Morocco) as you consider reasonable. I jotted down this recipe for vegetable tajine based on my observations of Mariam’s innate “feel” for cooking, and have used it numerous times over the past year. Not surprisingly, the dish has never quite approached Mariam standards, but, then again, what would?

Mariam’s Vegetable Tajine
Serves 6

2/3 cup* olive oil, plus 1 tablespoon
3 cloves garlic, chopped
3 tomatoes, peeled, seeded and chopped
10 small onions, cut in half from top to bottom, and sliced into fine rings
¼ cup chopped fresh parsley
1½ teaspoons ground cumin
1 teaspoon black pepper
1½ teaspoons sweet paprika
¾ teaspoon ground ginger
1 teaspoon salt
Water, as needed
2 pounds of potatoes, peeled and cut into ¾-inch chunks (I use new potatoes and cut them into quarters)
Scant cup green olives
6 quarter-pieces preserved lemon, rinsed and patted dry

Heat oil in a large saucepan over medium-high heat. (If you are lucky enough to have a traditional tajine pot at your disposal, by all means – use it!) Add the garlic, tomatoes, onions, parsley, spices and salt, and stir. Cook for 15 minutes, stirring frequently. If the mixture begins sticking to the bottom of the pan, add a little water. Meanwhile, soak the potatoes in water.


When the fifteen minutes are up, drain the potatoes and add them to the pan. Pour in enough water to submerge the mixture and stir. Cover the pot and bring the mixture to a boil. Add the remaining tablespoon of olive oil. Turn the heat down to medium-low, re-cover and simmer until the potatoes are soft, about 40 minutes. Place the green olives and preserved lemons (skin-side up) on top of the mixture and recover the pot. Cook for another 8 minutes.

Serve in bowls accompanied by bread to sop up all the lemony-tomatoey juice. Warning: Only eat the preserved lemons if you are brave! In fact, you might want to remove them from the dish before serving to avoid any accidents.

*Mariam uses 1 cup of olive oil in her tajine, but I find 2/3 cup is plenty.

Wednesday, August 02, 2006

Ode to Ugly Produce

Maybe I watched too many episodes of Charlie Brown’s Christmas as a child, but I have a soft spot in my heart for the unsightly, the unattractive and the downright ugly members of the plant kingdom. On the edible side of the kingdom, my favorite fruit is the custard apple, in all its sickly green and lumpy grandeur. A close second is the wrinkly-skinned passionfruit, followed by its shriveled brethren, the fig. I, too, admire the seed-studded splendor of strawberries and the blushing plumpness of a just-ripe peach, but I’m just as likely to reach into the fruit bowl for a plain-Jane Bosc pear.

It is not very surprising, therefore, that I am attracted to two very homely constituents of Zimbabwe’s native produce – masau fruit and dumbe (madumbe if you have more than one).

Hundreds of years ago, Arab traders brought masau from India to Africa, and today masau trees grow wild in the hot, dry Zambezi Valley. The fruit we buy at the side of the road are wine-colored and wizened, with a sweet and slightly sour taste that most closely resembles cherry-apple. The shape and texture is reminiscent of the dried plums I used to nibble on in China. Masau fruit are chewy, and you need to use your teeth to tear the flesh off the seed. They can be eaten as a snack, used to concoct a home-brewed alcoholic beverage called kachasu, and made into jam.

Meanwhile, under the ground grows the dumbe, a taro-like tuber cultivated in the mountainous Eastern Highlands of Zimbabwe. Its dark brown skin is pitted like the surface of the Moon and spouts tiny hairs.

Cut one open and you’ll see white flesh mottled with tiny burgundy lines, which, upon a quick glance, my husband thought were worms. Dumbe’s even uglier stepsister is the gogoya, whose interior is a sallow purple. A gogoya is so awkwardly large that it must be chopped into pieces with an axe.

Zimbabweans, who generally take tea at 10 in the morning, might consume cooked dumbe or gogoya with their cuppa. In fact, I’ve heard that once you’ve eaten dumbe with your tea, you just can’t go back to chingwa (bread).

Preparing dumbe is very simple.

Cooked Dumbe

1 dumbe
1 tablespoon salt
Sea salt, to taste

Peel the dumbe, cut it in half and drop it in some well-salted, boiling water. Let it boil for about 20 minutes, or until soft. Scoop the dumbe out of the water with a slotted spoon, and let it cool for just a few minutes. Cut into bite-size pieces, and eat with your tea.

The texture is quite dry, so if you aren’t a tea-drinker, make certain you have some other beverage handy. Dumbe’s taste is similar to that of a potato, but with a subtle, addictive nutty flavor, which can be enhanced with a grind of sea salt.

Some people might put masau and dumbe in the class of produce that needs to be kissed by a princess. I’ll put them in the same adorable underdog category as Charlie Brown’s Christmas tree.