Saturday, January 06, 2007

Make Hibiscus Tea (Then Vote for Me!)

This morning the weather cannot decide if it wants to be hot and sunny, cool and rainy or the pinnacle of atmospheric ambiguity – sunny and showering. I am just as restless. I made a shopping list, then decided the last thing I wanted to do was face the grocery store. Got dressed to do yoga, then plunked down on the couch. Flipped through a magazine, then tossed it aside. Began dismantling our Christmas tree, then got distracted by re-reading the cards we received.

I can’t even decide what to drink. Do I want a cup of hot tea? Or, do I want a glass of iced tea?

I better make BOTH.

The flowers of the hibiscus plant* are used in countries all around the world – from the Middle East, to North and West Africa, to the Caribbean, to Central America – to make a tangy, well-sweetened, ruby-colored tea that can be served either hot or cold. The tea is typically prepared by steeping the flowers (fresh or dried) in hot water, and then straining them out. Lots of sugar is added, and the tea is often infused with flavors that complement its cranberry-like taste, including lemon, mint, ginger, vanilla, pineapple and orange essence.

In Egypt and Sudan, the word for both the hibiscus flower and hibiscus tea is “karkaday” (or karkade). Legend has it that karakday was a favored beverage among the Pharaohs. Hibiscus flowers are known as “bissap” in Senegal and The Gambia, and the Senegalese call water infused with hibiscus flowers “jus de bissap.” For one hibiscus beverage, they mix a concentrated version of this “juice” with soda water, ginger ale or lemon-lime soda, which makes an exceptionally refreshing spritzer.

Hibiscus flowers can also be stewed to fill tarts and pies, or used to make jellies and jams. The excellent cookbook The Soul of a New Cuisine flavors then freezes hibiscus-steeped water to create a lovely, mint-garnished granité. In fact, given my current state of indecisiveness, it’s amazing that I could select tea as my preferred use of the ingredient! There are two recipes below – one for a cold Senegalese-style spritzer with vanilla accents, and one for a hot tea made with ginger and lemon.

Once you have settled down with your tea, please take a moment to check out the vast array of nominees in the 2006 Food Blog Awards. If you, like me, are having trouble making choices today, then you will be absolutely incapacitated by your voting options. Some stellar blogs have been nominated, and Field to Feast is up against tough competition in the Best Food Blog – Rural category. To check out the other nominees and cast your vote (before midnight EST on January 9!), please click here.

Iced Hibiscus Tea Spritzer
Serves 4

1 vanilla bean (you can use 2 teaspoons pure vanilla extract as a substitute)
2/3 cup sugar
2 2/3 cups water
1 cup dried hibis
cus flowers, lightly rinsed
Ice cubes
Soda water

Split the vanilla bean in half lengthwise and scrap the seeds into a small saucepan. Toss in the bean, and add the sugar and water. Stir. Bring to a boil, and then remove the pan from the heat. Stir in the hibiscus flowers and cover. Let the tea steep for 10 minutes.

Strain the liquid using a fine sieve, and then place the liquid in the refrigerator to chill. When you are ready to drink your beverage, fill four glasses with ice cubes and divide the liquid between them – each glass should be about 1/3-1/2 full. Top up with soda water and serve.

Hot Hibiscus Tea
Serves 2 (using mugs) or 3 (using teacups)

2 cups of water
½ cup dried hibiscus flowers, lightly rinsed
¼ cup sugar
¼ teaspoon grated fresh ginger
2 tablespoons fresh lemon juice
Lemon slices, for garnish

Bring the water to a boil in a small saucepan, take it off of the heat and add the hibiscus flowers. Cover the pan, and steep the tea for 10 minutes. Strain the tea using a fine sieve into a small bowl. Add the sugar, ginger and lemon juice and stir until the sugar is dissolved. Serve hot, with lemon slices.

*Technically it is the hibiscus calyx, not the flower, which is used to make tea. Also, to be precise, only one variety of hibiscus is used for culinary purposes - Hibiscus Sabdariffa, which is commonly known as roselle or red sorrel in English.

Wednesday, January 03, 2007

Pizza for the Adventurer

All right, Mr./Ms. Adventurous Eater: so, you think you’ve tried every type of pizza there is. You’ve ordered the egg and ham pizza in Australia, had slices of biltong grace your South African pie, and eaten just about every topping combination from yuppie vegetarian (organic rocket pesto accompanied by slow-roasted tomatoes, Thai basil and fresh, hormone-free ricotta) to redneck carnivore (name-your-meat slathered in ranch dressing).

But have you tried Zanzibar pizza? I didn’t think so.

When Mark and I visited Zanzibar last November, we discovered that one of the most popular food items at the night market was this stuffed bread dish. It’s not really pizza – there is no cheese or sauce to speak of – but, it somehow tastes strangely similar. The bread lies somewhere between a crêpe and a chapatti, the filling typically includes mince meat, onion, chili, egg, garlic and mayonnaise, and the whole shebang is topped with hot sauce.

Last night Mark and I made a vegetarian version that compensated for the meat with cabbage and tomato. I could have closed my eyes and told you that what I was eating was Zanzibar pizza. But, as I have previously writtenit is impossible to separate a food from a place or an experience. Zanzibar pizza is no different. Without the sound of waves crashing and vendors hawking, the smell of fish grilling, and the sight of smoky fires and headscarf-clad women, Zanzibar pizza was Zanzibar pizza, but it wasn’t Zanzibar pizza. Does that make any sense?

If you’ve never eaten Zanzibar pizza on Zanzibar, then you won’t have this problem, and you will enjoy the dish for what it is – a tasty snack or light, casual main course that welcomes being washed down with a frosty glass of beer.

Zanzibar Pizza
Adapted from A Taste of Zanzibar: Chakula Kizuri
Serves 6

2 cups / 250 grams plain flour
½ teaspoon / 2.5 milliliters salt
½ cup / 125 milliliters water (plus more, if needed)
Vegetable oil, for coating dough and frying
1 medium onion, minced
2 small tomatoes, chopped
1 cup cabbage, finely shredded
3 fresh chilies, deseeded and minced (I used two green and one red, for color)
1 tablespoon / 15 milliliters fresh garlic, minced
1 tablespoon / 15 milliliters fresh ginger, grated
2 tablespoo
ns / 30 milliliters cilantro (a.k.a. fresh coriander) stems and leaves, chopped
6 eggs
Salt and freshly ground black pepper, to taste
Tomato chutney and/or hot sauce, for serving

Sift the flour into a medium bowl and add the salt. Pour in the water, adding more, if necessary, to create a smooth dough. Knead the dough for three minutes, and then divide it into six equally-sized balls. Place the dough balls in a shallow dish, rub plenty of vegetable oil over them, and cover the dish. Let the dough sit for two hours.

Stretch the dough into a very thin 10-inch / 25-centimeter circles, making sure that the edges are thinner than the centers. Place 1/6 of each topping (onion, tomato, cabbage, chili, garlic, ginger and cilantro) in the center of each circle. Now, here is where talented Zanzibari street vendors would effortlessly crack an egg over these toppings and seal the dough into a package without any egg sliding out. I am not this talented. So, I would recommend frying the eggs until they are just set, and then adding one to each pizza. Grind salt and pepper over everything, to taste. Then, fold the top and bottom sides of the dough to the center, and close the dough package by folding in the left and right sides. Make sure there are no holes in the dough or any cracks where egg or filling could escape.

Cook the pizza packages, using as little vegetable oil as possible, in a fry pan over medium-low heat. How many you can cook at one time depends on the size of your fry pan. (Note: If you need to make multiple batches, it is advisable to keep the dough balls covered until you are ready to use them.) You want to cook the pizzas until the dough is toasty-brown on both sides and the fillings are warmed through, all while making sure that runny egg doesn’t escape during the process of flipping the pizza. Acquiring such certainty requires about eight minutes of cooking on one side, and three on the other.

Serve hot, with a spoonful of tomato chutney or hot sauce on top and, if you desire, a garnish of extra cilantro and minced chilies.

Okay, maybe now you’ve tested every pizza possibility.

Thursday, December 28, 2006

For New Year's, a Tradition or Two

A few years ago, I decided to ring in the New Year by undertaking every New Year’s Eve or New Year’s Day tradition I had ever heard of, along with whatever interesting customs I could find on the Web. It was a busy December 31st.

I was living in the southern U.S. at the time, so of course I had to prepare black-eyed peas (for good luck), greens (for money) and cornbread. I wasn’t (and am still not) certain how cornbread consumption might enhance my New Year, but it didn’t really matter, because what are beans and greens without a slab of cornbread? I hid a well-scrubbed coin inside the cornbread, for it seemed a country-spanning tradition (Greece, Norway) to hide things inside of holiday food – items which, happily, would bestow good luck upon whoever bit into them.

Although Chinese New Year falls at a different time of year, I adopted its traditions, too – giving my husband a red envelope filled with coins and sweeping dirt into piles, then carrying the dirt out of my house through the back door. Like Spaniards, my friends and I ate 12 grapes in rapid succession as the clock struck midnight, while trying, with limited success, to simultaneously sing Auld Lang Syne, kiss our significant others and make a champagne toast. I really wanted to attempt the Brazilian seaside custom of jumping seven waves while tossing flowers and making a wish, but it just wasn’t possible. It would have been nice, though, to know that the goddess of the sea would make my wish come true.

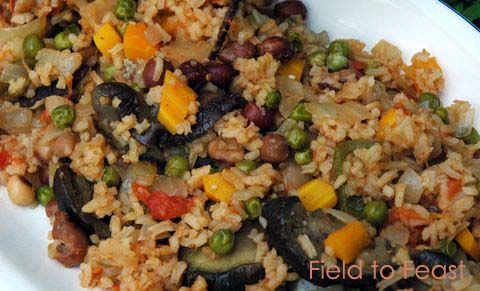
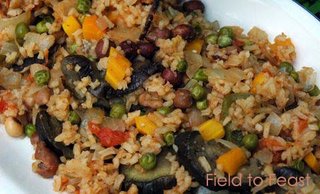
This year, I’m keeping it simple: I’ve cooked a vegetarian version of jolof rice that features black-eyed peas. This West African specialty also happens to be so flexible that I could say “out with the old, in with the new” to all the veggie odds and ends I had lying around. Okay, so preparing jolof rice didn’t help me sweep my house, but it did help me clean my fridge.

Jolof rice (also spelled “jollof” and “djolof”) can be made with meat, chicken, fish, or, like the recipe below, with simply vegetables and beans. You can be very creative with this dish, as long as your final product is spicy and the rice is dyed a reddish color from the use of a sufficient quantity of tomatoes. You could employ the exact same vegetables as I did, or you could add or substitute chopped green beans, cubes of butternut squash, shredded cabbage, or finely sliced scallions, for example. Jolof rice is well-complimented by a cool and refreshing side dish, such as a cucumber salad or mild mango salsa. Note that this recipe differs from more traditional versions in that it requires baking as a final step, which deftly melds the flavors together.
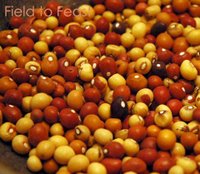
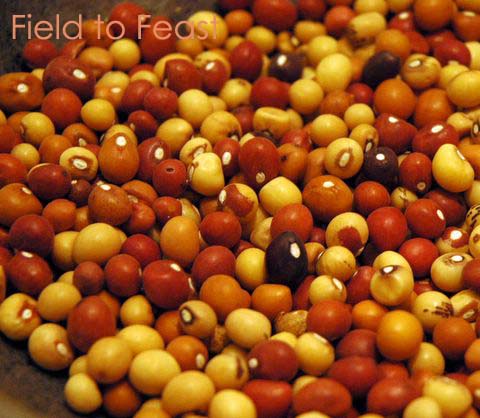
Another note: You might have trouble spotting the black-eyed peas in my photo. That’s because I used Zimbabwe’s version of the black-eyed pea, which is called the nyemba bean. (For those regular readers with good memories, yes – it is the leaves of this bean plant that are dried to make mufushwa.) Dried nyemba beans range in color from mustard yellow to brown to black and they all sport the trademark white “eye.” A handful of nyemba is a colorful sight. Sadly, however, every nyemba bean turns the same, dingy brown color when cooked, which caused them to disappear into my jolof rice, just when I wanted them to take center stage. Here’s a toast to hoping the nyemba beans will still provide me (and you!) with lots of good luck in 2007. Happy New Year!

West African Jolof Rice
Adapted from Vegetarian Times Complete Cookbook
Serves 6-8 as a main dish

1 cup dried black-eyed peas
2 medium eggplants, sliced into ½-inch / 12-millimeter rounds
2 teaspoons salt
1½ tablespoons vegetable oil
1 cinnamon stick
2 large onions, chopped
2 tablespoons fres
h ginger, minced
2-3 green chilies, seeded and chopped*
2 cloves garlic, minced
1 green bell pepper,
chopped
5 large tomatoes, peeled and chopped
1½ tablespoons tomato paste
2 teaspoons cayenne pepper
2 teaspoons hot c
urry powder (or mild, if you prefer)
1 pound / 450 grams carrots, chopped
1½ cups uncooked rice, preferably long-grained
1½ cups green peas (fresh, or frozen and defrosted)
Salt and freshly ground black pepper, to taste
Hot sauce, optional

Soak the black-eyed peas overnight in plenty of water. Drain, and put the black-eyed peas in a large saucepan with 2 quarts / 1 liter of fresh water. Bring to a boil, and then turn the heat down so that the black-eyed peas are simmering. Simmer for 45 minutes to 1 hour, or until the beans are tender. Drain and rinse the black-eyed peas, reserving their cooking water.

Place the eggplants slices in a colander and sprinkle 1 teaspoon of salt over them. Toss the slices with your hands to distribute the salt. Leave the eggplants to “drain” for at least five minutes. Pat them with a paper towel to remove any moisture that has seeped out.

Heat the vegetable oil in a large, wide saucepan over medium heat. When the oil is hot, add the cinnamon stick and let it sizzle for a few seconds. Add the eggplants, one tablespoon of the onion, one tablespoon of the ginger, one of the chilies, one clove of garlic and the bell pepper. Cook, stirring frequently, for 5-10 minutes until the eggplants have turned a reddish-brown. Remove the eggplants from the pot, and set them aside.

Add the remaining onion, ginger, chili, garlic and 1 teaspoon salt to the pot, along with the reserved liquid from cooking the black-eyed peas (there should be at least 3 cups or so). Also add the tomatoes, tomato paste, cayenne pepper and hot curry powder. Stir. Bring to a simmer and cook for 10 minutes. Meanwhile, pre-heat your oven to 400°F / 205°C.

Add the black-eyed peas, carrots and rice to the pot, and stir. Cook for five minutes. Then add the green peas and eggplant slices. Stir, and cook for 15 minutes more. Test the seasoning, adding salt and freshly ground black pepper as needed. Remove the cinnamon stick.

Transfer the mixture to a large, ovenproof casserole dish. Cover the dish with aluminium foil and bake for 25 minutes. Serve hot, with a squirt of the optional hot sauce, if desired. I like to use a spicy sweet chili sauce called “hot zvakananka sauce” (“zvakanaka” means “good” in Shona), which is locally made by Peter Piper’s.

*The original recipe calls for roasted chilies, but I’m not convinced the extra work roasting the chilies is worth it.

Saturday, December 23, 2006

Stuffed Squash, with Ornaments

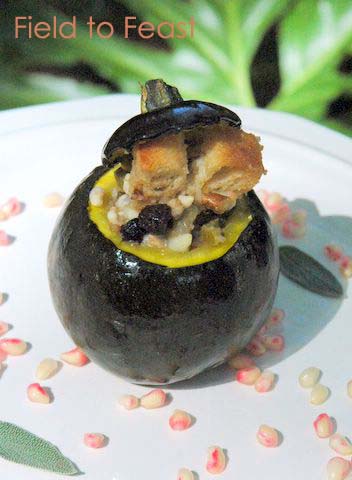
Perhaps I can blame the seasonal cocktail of excess sugar consumption, prolonged exposure to Christmas music and visions of days off work dancing in my head for inducing my recent streak of peculiar thoughts. Like this one, which came to me upon spotting some gem squash at the grocery store – “My, these look like Christmas ornaments. I should cook them for the holidays.” It was quickly followed by this idea, hatched while pulling into the driveway: “The pomegranates growing on our tree look like ornaments, too! I should concoct a holiday dish combining both “ornaments” – gem squash and pomegranates.

And so gem squash with pomegranate, pecan and parsley stuffing was born. My husband gave me a “you are crazy – you know that, right?” look as I hung my “ornaments” on a string of pine-branch garland for inspiration, and I began cooking.

Gem squash are a common vegetable in southern Africa, and, according to Jeanne at Cook Sister!, they are another one of those food items that South Africans in the Diaspora long for. I can see why. These dark-green globes are downright adorable, easily beating out butternut’s half-an-hourglass curve on the squash-attractiveness scale. They also cook quickly, sport a lively yellow-color flesh, and are ideal for filling with all manner of savory treats, from curry to rice pilaf to couscous to bread stuffing. You can also add chunks to lentil dhal.

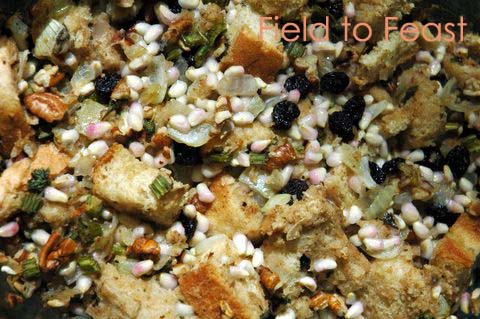
A quick Web search revealed that pomegranate stuffing wasn’t an idea unique to me, although I would hazard a guess that these other cooks weren’t motivated to use pomegranate because it resembles a Christmas ornament. I drew bits from these recipes and combined them with parts of Nic’s vegetarian stuffing recipe to create my own pomegranate stuffing.

Mark may have smirked at my “ornaments,” but he had nothing but compliments for the final stuffed gem squash dish. The pomegranate seeds added a crunchy texture and tart bite to the stuffing, while the flavors of baked squash, sage, and pecan evoked memories of Christmases past. His verdict? “Tastes like the holidays.”

Gem Squash with Pomegranate, Pecan and Parsley Stuffing
Serves 6 as a side dish

6 gem squash
2 teaspoons, plus 1 tablespoon olive oil
¼ teaspoon salt
1 small onion, diced
¼ cup celery, diced
¼ cup fresh parsley, minced
2 teaspoons fresh sage, minced
Salt and freshly ground black pepper, to taste
1 cup pomegranate seeds, plus extra for garnishing
¼ cup raisins
¼ pecans, chopped
3½ cups bread, cubed
½ cup vegetable broth

Preheat your oven to 350°F/175°C. Slice the top off each squash and scoop out all of the seeds. Use 2 teaspoons of the olive oil to coat the inside cavities of the squash; sprinkle the salt inside, too. Cover the squash bottom with its lid and place on a lightly-greased baking sheet.

Heat the remaining 1 tablespoon of olive oil in a fry pan over medium heat. Add the onion, celery, parsley, sage, salt and pepper, and stir. Sauté for 5 minutes, then remove the pan from the heat.

In a large bowl combine the onion mixture, pomegranate seeds, raisins, pecans and bread cubes. Pour in the vegetable broth and stir carefully until all the bread cubes are moistened (adding more broth, if necessary). Place the stuffing in a lightly-greased, medium-size baking dish and cover with aluminum foil.

Put both the baking sheet with the squash and the baking dish with the stuffing into the oven at the same time. Bake for 20 minutes. Take the aluminum foil off of the stuffing and check the squash to see if they need to be basted with more olive oil. Return both items to the oven and cook for another 20 minutes. The squash should be soft, but still holding its shape, and the bread in the stuffing should look a bit crunchy.

To serve, fill each squash with the bread stuffing. Any additional stuffing can be served alongside the squash. Use any extra pomegranate seeds as garnish.

This post is an entry in Holiday Cooking with Herbs, a special holiday edition of Weekend Herb Blogging hosted by the amazing Kalyn at Kalyn’s Kitchen. I’ve intended to participate in Kalyn’s landmark food blog event ever since I started Field to Feast, and I’m glad the holidays finally inspired me to take the plunge!

Wednesday, December 20, 2006

Amarula, and Other Weighty Topics

In the U.S., it is a generally accepted rule that you do not talk to a woman about her weight – unless, that is, you plan to enthuse over how many pounds she has shed. One would never think of telling a woman that she has gained weight, and would cautiously avoid the pitfall of asking a woman if she is pregnant – only to find out that she is not.

The same social mores do not apply in Africa.

“You look as if you have put on some weight! Your mom must have cooked all your favorite foods while you were home.”

“Your face is looking nice and round, are you expecting?

“You’ve gained weight since I last saw you – now you are becoming an African woman!”

Over the past 20 months in Zimbabwe, I have been on the receiving end of numerous permutations of the three quotes above – each said to me by a well-intentioned friend or colleague. You see, here in Africa, the standard of beauty is not to be skinny as a beanpole, but plump as a peach.

The logical, rational part of my brain reassures me that such comments are actually compliments on a continent where extra weight means that you are able to purchase plenty of food for your family. In fact, the women who run a craft collective where my husband volunteers recently boasted that, due to the success of their initiative, they had become “fat and fatter.” I’ve also noticed that remarking on a woman’s weight gain – real or not – after a holiday is a cultural courtesy, similar to the way people in the States would tell co-workers that they appear well-rested upon returning from a vacation.

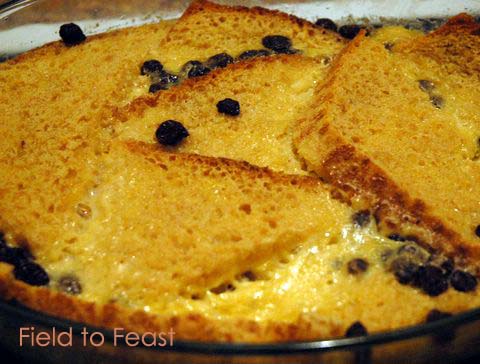
I can’t wait to hear what people say when I come back from the Christmas break having gorged myself on Amarula bread and butter pudding with cinnamon custard.

Amarula is a cream liqueur produced in South Africa. It is made by sweetening and fermenting the fruit of the marula tree, maturing this spirit in an oak cask for two years, and then blending it with cream. The result is rich, silky and lightly fruity. A much less time-consuming process goes on in rural Zimbabwean villages, where marula fruit is fermented to make a potent homebrew. Alcohol isn’t the only use for marula – one local company turns the fruit into a dark, thick jam. And, humans aren’t the only mammals who enjoy marula – it is also a favorite food for elephants. (In fact, a common myth says that the fruit makes elephants drunk. Scientific research, however, has proven otherwise.)

Amarula bread and butter pudding is not a dessert for the faint-hearted, nor for the dieting, as butter, cream and sugar all appear in substantial quantities. It is a warm, comforting dessert – perfect for casual holiday gatherings – with a taste and texture reminiscent of French toast. If you don’t have Amarula, you can easily substitute Bailey’s or Kahlua.

Enjoy! And, if you eat too much pudding, hop on a plane to Africa. I’m sure you’ll receive many compliments.

Amarula Bread and Butter Pudding with Cinnamon Custard
Adapted from the Amarula website and Food and Home Entertaining, May 2001
Serves 10-12

Pudding
50 grams / 3½ tablespoons butter, well-softened
8 slices of soft bread with a soft crust, sliced in half diagonally
50 grams / 1/3 cup raisins, soaked in warm water and drained
500 millilitres / 2 cups milk
375 ml / 1½ cups double cream
5 millilitres / 1 teaspoon vanilla extract
6 large eggs
200 grams / 1 cup castor sugar
125 millilitres / ½ cup Amarula

Custard
500 millilitres / 2 cups milk
2 cinnamon sticks
45 millilitres / 3 tablespoons castor sugar, or to taste
3 egg yolks
15 millilitres / 1 tablespoon cornflour

Icing sugar, for dusting

Use a little of the butter to grease a large, shallow, ovenproof dish. Use the rest to butter both sides of each piece of bread, and lay these pieces evenly in the bottom of the dish. Sprinkle the raisins over the bread.

In a medium saucepan, bring the milk, cream and vanilla extract to a boil. (Watch the pot when it is getting close to a boil to avoid it bubbling over!) Meanwhile, in a medium bowl, whisk together the eggs and castor sugar. Gradually add the milk-cream mixture to the bowl, stirring constantly. (It helps to have a friend/spouse pour while you stir, or vice versa.) Stir in the Amarula.

Pre-heat the oven to 180°C (360°F). Pour the Amarula mixture over the bread and allow it to soak for 15 minutes. Bake the pudding for about 40 minutes, or until it is golden and set, with just a slight wobble in the middle. Remove from the oven and let cool for 10 minutes.

To prepare the custard, pour the milk into a small saucepan, add the cinnamon sticks, and bring to a boil. Reduce the heat and let simmer for 15 minutes, stirring occasionally to prevent a film from forming. Remove the cinnamon sticks and take the pan off the heat. Whisk together the castor sugar and egg yolks, and then whisk them into the milk. Continue stirring until all the sugar has dissolved. Mix the cornflour with a little water (about 1 teaspoon) to make a paste, and add it to the custard. Return the pan to the heat and cook over a low heat until the custard has thickened.

Serve the Amarula bread and butter pudding warm, with a dusting of icing sugar and a spoonful of cinnamon custard.

Note: Our electricity went out (for the third time in three days) while I was cooking the custard, so it is not pictured. And, Mark only had a chance to take one nighttime photo of the dish under lights. Alas, power cuts are one of the less appealing things about life in Zimbabwe!

Friday, December 15, 2006

Faves on Fridays #2: Spaghetti with Beetroot Pesto

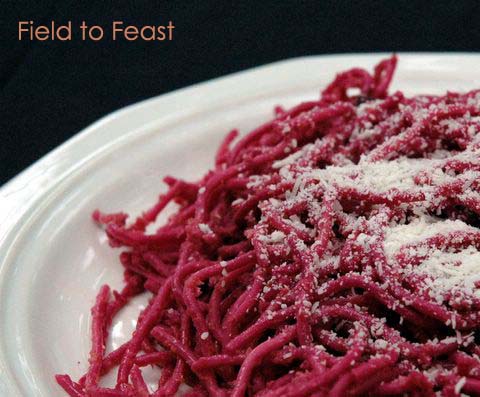
Invite your friends over for pasta, and they will expect you to serve up a meal that is tomato-red; white-sauce cream or bright basil green. Set a plate of spaghetti with beetroot pesto before them and watch their eyebrows rise. Some guests will stare warily at their dish, as if it may be radioactive. Others will lean in closely and turn their plate around, admiring the pasta like they would a budding flower. It will be your frank, no-nonsense friend who breaks the awkward silence and says: “I’ve never eaten anything this color. What on earth have you done?

What you have done is boil a couple of beets until they are soft, and then blitz them in the food processor along with some olive oil, Parmesan cheese, lemon juice, pine nuts and a chili. The resulting pesto is lush and creamy, with a spicy kick. It is also, of course, a shocking shade of fuchsia. When you toss the pesto with cooked spaghetti, the spaghetti strands morph from dirty-blond to punk-rock pink in seconds. Even people who consider beets to be one of those vegetables they tolerate rather than crave will enjoy this dish, especially when it is topped with slices of seasoned and baked ricotta cheese. (Not shown in the photo – I was out of fresh ricotta and had to settle for grated Parmesan this time!)

Spaghetti with beetroot pesto and baked ricotta is ideal for warm summer nights and festive wintertime buffets, or when you need to extricate yourself from a brown-food rut. Be warned, however – once you serve this dish to your friends, they may begin responding to your dinner invites with a wink and a query: “So, tell me, what color dish are you making tonight?”

Spaghetti with Beetroot Pesto and Baked Ricotta
Serves 6

Pesto
2 medium beets
1/3 cup Parmesan cheese, grated
4 teaspoons pine nuts, toasted
1 fresh green chili, deseeded and minced
Juice of 1 lemon
2 teaspoons roasted garlic paste (optional)
50 milliliters / 3 tablespoons plus 1 teaspoon olive oil
Salt and freshly ground black pepper, to taste

Baked ricotta
450-gram / 1-pound wheel of fresh ricotta cheese (not the kind that comes in a plastic container)
Olive oil
1 teaspoon dried thyme
1 dried red chili, crushed
Salt and freshly ground black pepper

500 grams / 1 pound spaghetti

Cook the beets in plenty of boiling water until they are tender, about 35 minutes. While the beets are boiling you can prepare the other pesto ingredients, as well as the baked ricotta.

To make the pesto, peel the cooked beets, chop them into chunks, and blend them together with the Parmesan cheese, pine nuts, chili, lemon juice, roasted garlic paste (optional) and olive oil in a food processor until smooth. Add salt and pepper to taste.

To prepare the baked ricotta, begin by pre-heating your oven to 400 degrees F (200 degrees C). Place the ricotta wheel on a baking sheet and cut it into two pieces. Pour the olive oil over the cheese and use your hands to coat both pieces. Sprinkle the dried thyme, dried red chili, salt and pepper over the cheese, and use your hands to ensure each side gets seasoned. Bake in the oven until the cheese has just begun to turn brown – about 20 minutes.

Meanwhile, cook the spaghetti in salted water until al dente. Drain. Put the spaghetti into a serving bowl, spoon on the pesto and toss until each strand is evenly covered. Serve topped with slices of the baked ricotta (or grated Parmesan, as an alternative).

Inspiration for this dish came from a Jamie Oliver recipe for pasta with sweet tomato sauce and baked ricotta, as well as from a pesto recipe in the July 2006 edition of Food and Home Entertaining. I mingled and adapted these recipes to create this Fave. Note that slices of baked ricotta can also make a lovely appetizer when laid atop a cracker.

Want to read my first Fave on Friday? Click here.

Sunday, December 10, 2006

Ful Medames, the Holiday Antidote

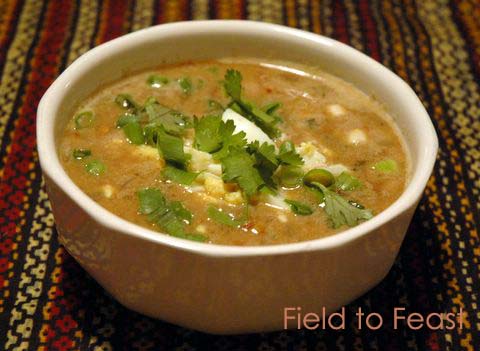
Eggnog, cheese balls, shrimp dip, trifle, fruit cake – there is no doubt about it, the closer we get to the holidays, the richer and heavier our food and drink becomes. Following a festive evening, what I really want to eat is an antidote to all that gluttony. Something nutritious, comforting and uncomplicated that resets my body’s balance and allows me to face another Christmas party buffet, plate in hand.

Ful medames is just such a meal. I’ve found three references to this rustic fava bean stew over the last few months, all of which highlight its role as a daily staple in Egypt (where some consider it a national dish) and Sudan.

First, I spotted an October 3 New York Times article entitled “A Hand on the Ladle, and a Eye Out for the Law,” which told the story of the popular – but unlicensed, and therefore illegal – street vendors who ply Cairo’s poorest neighborhoods selling ful from their carts for the equivalent of 20 cents. Then, in Emma’s War: a True Story, I read journalist Deborah Scroggins’ descriptions of her attempts, during a 1988 visit to Khartoum, Sudan, to meet with government officials in order to gain permission for a trip to a refugee camp. Her task was complicated by the fact that the officials arrived to work at 8, took a break at 10 to eat a breakfast of ful, left for lunch and a nap at 1, and rarely returned to the office. Finally, just this weekend, I was devouring Apricots on the Nile: A Memoir with Recipes when I came across Colette Rossant’s reminiscences on ful medames, a dish she discovered as a child during World War II when she lived in Cairo with her Egyptian grandparents. Their cook made ful medames everyday for the household staff, while concocting much more glamorous dishes for Colette and her family. Nevertheless, young Colette loved ful medames. Per her grandmother’s instructions, she was supposed to eat a baguette with butter and jam as an after-school snack, but Colette and the cook conspired to ensure she could eat ful medames instead.

Although ful medames is more typically eaten for breakfast or as a snack, I like to have a bowl for lunch or as a light supper. It is an especially appealing meal when I crave something wholesome and nourishing after a lazy holiday afternoon spent grazing over cheese platters and cramming my plate with every dessert on offer. Meet ful medames, my un-holiday holiday dish.

Ful Medames (Fava Bean Stew)
Serves 4 as a light main course

2 tablespoons olive oil
1 onion, chopped
2 garlic cloves, crushed
1 teaspoon ground coriander
1 teaspoon ground cumin
½ teaspoon cayenne pepper
2 bay leaves
1 large tomato, peeled and chopped
4 cups vegetable stock
2 15-ounce cans fava beans, rinsed and drained
2 tablespoons lemon juice
2 tablespoons tahini
¼ cup fresh parsley, chopped
1 teaspoon salt
Salt and freshly ground pepper, to taste
4 hard-boiled eggs, chopped
3 scallions, sliced
Cilantro leaves, for garnish

Heat the olive oil in a large saucepan over medium heat, and sauté the onions and garlic until the onions are translucent. Add the ground coriander, ground cumin, cayenne pepper and bay leaves, and cook for 3 minutes, stirring frequently. Stir in the chopped tomato and vegetable stock, and bring to a boil. Reduce the heat and simmer for 15 minutes.

Meanwhile, mash together the fava beans, lemon juice, tahini, parsley and salt in a separate bowl. Stir this mixture into the soup, making sure to break up any clumps of the mash. Simmer for another 8 minutes. Add salt and pepper to taste, and remove the bay leaves. Ladle into serving bowls, scooping up from the bottom of the pot. Top with the eggs, scallions and cilantro leaves. Serve with warmed pita bread. If you want to eat ful as the Egyptians and Sudanese do, try using the pita bread to scoop up the stew, sans spoon.

This post is an entry in the Super Souper Challenge, a food blog event hosted by running with tweezers.

Tags: , , , , , , , , , , ,