Showing posts with label West Africa. Show all posts

Sunday, April 01, 2007

Home-Baked Beans

About seven years ago, I worked at a global education museum, where I helped develop exhibits that introduced U.S. schoolchildren to the world outside their country’s borders. One of the exhibits encouraged kids to think about how people around the world are connected by international trade. In an effort to make these connections, sometimes I’d talk with groups of children about where their favorite foods came from. Here is the start of a typical discussion:

Me: Today, let’s talk about some of your very favorite foods and think about where they come from. Who wants to tell us their favorite food? Let’s hear from you [pointing to the 8-year-old in the blue sweatshirt jumping up and down with his hand raised].

Boy: Hot dogs!

Me [thinking, oh dear, I really don’t want to get in a discussion about where hot dogs come from]: Great, that’s a great favorite food. Let’s hear from someone else, too. How about you [pointing to the girl in the purple shirt]?

Girl: Macaroni and cheese!

Me: What kind of macaroni and cheese, the kind you make at home, or the kind you buy in a box?

Girl [screwing up her face as if confused]: Well, we make it at home but it comes from a box!

Me: Oh, right, of course. Now, where does that macaroni and cheese come from?

All the kids in unison: THE SUPERMARKET!

Me: But, how did the box get to the supermarket?

Children [blank stares, silence].

Me: And how did the noodles and cheese get into the box?

Children [blank stares, silence].

Me: And where did the noodles and cheese come from?

Children [blank stares, silence].

Me: Do you think that boxes of macaroni and cheese grow on supermarket shelves?

Children [laughter, followed by blank stares].

Me: Okay, let’s try to work backwards and figure out how this box got to your supermarket….

This story brings me, somehow, to baked beans. Because, not too long ago, if you had asked me how a can of baked beans got to my house, I would probably stutter and stumble and say something like: well, obviously, the beans need to be baked, probably in big batches in a very big oven. Hmm, I’m not sure what type of beans they are, though – maybe a special baking bean? And then there is the sweet and salty sauce that goes on them, or maybe that is what they are baked in – I’m not sure. And then the whole mixture gets poured into a can and goes by truck to the supermarket where I buy it!

Being from Boston, the home of Boston baked beans, I feel I should definitely know more about baked beans and where they come from. Lucky for me, food writers and bloggers have been quite interested in baked beans lately.

While seeking out an African version of baked beans, I found Madhur Jaffrey’s recipe for Baked Beans with Nigerian Seasonings. These beans are warmth itself, satisfying and hearty with a hint of spice. They work well as a light dinner or side dish – just remember that the recipe takes two hours to bake, so its not something you want to start preparing at 7:30 on a weeknight! If you have leftovers, try a breakfast of whole-wheat toast topped with the beans.

The main seasoning in these beans is curry powder, which I more closely associate with the East African coastal cooking of Kenya and Tanzania and the Cape Malay cuisine of South Africa rather than with Nigerian cooking. But Jaffrey is one of my favorite chefs, so who I am to question her? After all, the recipe does ask for a hefty amount of black pepper – a very Nigerian touch. The other interesting ingredient in these baked beans is peanut butter, an item used in many dishes in sub-Saharan Africa (including this stew and this snack). In fact, to my mind, these beans are better named “Africa-inspired baked beans.”

I’ve prepared Jaffrey’s baked beans several times now, and I like to make them even more Africa-inspired (and a bit more colorful) by adding a locally-grown green leafy vegetable (such as rape, covo or pumpkin leaves). I’ve added greens both before and after the baking stage. I think “after” works better, although this is not how I did things on the day my husband took the photo above. The recipe works best with delicate cannellini beans, but any small-to-medium white bean will do. When I can’t find white beans at the store, I use local sugar beans instead. Finally, note that you can modify the proportion of hot versus mild curry powder depending on your heat preferences. Enjoy!

Baked Beans with Nigerian Seasonings
Slightly adapted from World Vegetarian
Serves 4-6

180 grams / 1 cup dried cannellini beans
62 milliliters / ¼ cup peanut or canola oil
1 medium onion, peeled, halved and thinly sliced
4 garlic cloves, peeled and finely chopped
5 milliliters / 1 teaspoon hot curry powder
10 milliliters / 2 teaspoons mild curry powder
2 large tomatoes, peeled and finely chopped
22.5 milliliters / 1½ tablespoons smooth peanut butter
6.2 milliliters / 1¼ teaspoons salt
Very generous grind of black pepper
45 grams / 1½ cups of your favorite green leafy vegetable, finely chopped

Soak the beans overnight in plenty of water. Drain.

Put the beans in a pot with 875 milliliters / 3½ cups of water and bring to a boil, skimming off the foam that rises to the top. Cover partially, turn the heat down to medium-low, and simmer gently for 40-60 minutes until the beans are just tender.

Meanwhile, heat the oil in a large fry pan over medium-high heat. Add the onion and cook for 1-2 minutes until the onion has just wilted, stirring almost constantly to ensure it doesn’t burn. Add the garlic, stir, and cook for another 2 minutes, stirring frequently. Add the curry powders and stir, then add the tomatoes and stir again. Cook for 7-10 minutes, until the tomatoes have softened. Transfer this mixture into a medium casserole dish.

Pre-heat the oven to 162°C / 325°F while you wait for the beans to finish cooking.

Spoon the peanut butter into a small bowl. When the beans are ready, remove 6 tablespoons of the cooking water from the pot and slowly add it to the peanut butter, stirring as you go. Pour the beans and their remaining liquid into the casserole dish. Stir in the peanut butter mixture, salt and pepper.

Bake, uncovered, for two hours until much of the liquid has evaporated and the beans are very tender. Add the greens just after you remove the dish from the oven, and stir them around until they wilt. Serve hot.

Saturday, January 06, 2007

Make Hibiscus Tea (Then Vote for Me!)

This morning the weather cannot decide if it wants to be hot and sunny, cool and rainy or the pinnacle of atmospheric ambiguity – sunny and showering. I am just as restless. I made a shopping list, then decided the last thing I wanted to do was face the grocery store. Got dressed to do yoga, then plunked down on the couch. Flipped through a magazine, then tossed it aside. Began dismantling our Christmas tree, then got distracted by re-reading the cards we received.

I can’t even decide what to drink. Do I want a cup of hot tea? Or, do I want a glass of iced tea?

I better make BOTH.

The flowers of the hibiscus plant* are used in countries all around the world – from the Middle East, to North and West Africa, to the Caribbean, to Central America – to make a tangy, well-sweetened, ruby-colored tea that can be served either hot or cold. The tea is typically prepared by steeping the flowers (fresh or dried) in hot water, and then straining them out. Lots of sugar is added, and the tea is often infused with flavors that complement its cranberry-like taste, including lemon, mint, ginger, vanilla, pineapple and orange essence.

In Egypt and Sudan, the word for both the hibiscus flower and hibiscus tea is “karkaday” (or “karkade”). Legend has it that karakday was a favored beverage among the Pharaohs. Hibiscus flowers are known as “bissap” in Senegal and The Gambia, and the Senegalese call water infused with hibiscus flowers “jus de bissap.” For one hibiscus beverage, they mix a concentrated version of this “juice” with soda water, ginger ale or lemon-lime soda, which makes an exceptionally refreshing spritzer.

Hibiscus flowers can also be stewed to fill tarts and pies, or used to make jellies and jams. The excellent cookbook The Soul of a New Cuisine flavors then freezes hibiscus-steeped water to create a lovely, mint-garnished granité. In fact, given my current state of indecisiveness, it’s amazing that I could select tea as my preferred use of the ingredient! There are two recipes below – one for a cold Senegalese-style spritzer with vanilla accents, and one for a hot tea made with ginger and lemon.

Once you have settled down with your tea, please take a moment to check out the vast array of nominees in the 2006 Food Blog Awards. If you, like me, are having trouble making choices today, then you will be absolutely incapacitated by your voting options. Some stellar blogs have been nominated, and Field to Feast is up against tough competition in the Best Food Blog – Rural category. To check out the other nominees and cast your vote (before midnight EST on January 9!), please click here.

Iced Hibiscus Tea Spritzer
Serves 4

1 vanilla bean (you can use 2 teaspoons pure vanilla extract as a substitute)
2/3 cup sugar
2 2/3 cups water
1 cup dried hibis
cus flowers, lightly rinsed
Ice cubes
Soda water

Split the vanilla bean in half lengthwise and scrap the seeds into a small saucepan. Toss in the bean, and add the sugar and water. Stir. Bring to a boil, and then remove the pan from the heat. Stir in the hibiscus flowers and cover. Let the tea steep for 10 minutes.

Strain the liquid using a fine sieve, and then place the liquid in the refrigerator to chill. When you are ready to drink your beverage, fill four glasses with ice cubes and divide the liquid between them – each glass should be about 1/3-1/2 full. Top up with soda water and serve.

Hot Hibiscus Tea
Serves 2 (using mugs) or 3 (using teacups)

2 cups of water
½ cup dried hibiscus flowers, lightly rinsed
¼ cup sugar
¼ teaspoon grated fresh ginger
2 tablespoons fresh lemon juice
Lemon slices, for garnish

Bring the water to a boil in a small saucepan, take it off of the heat and add the hibiscus flowers. Cover the pan, and steep the tea for 10 minutes. Strain the tea using a fine sieve into a small bowl. Add the sugar, ginger and lemon juice and stir until the sugar is dissolved. Serve hot, with lemon slices.

*Technically it is the hibiscus calyx, not the flower, which is used to make tea. Also, to be precise, only one variety of hibiscus is used for culinary purposes - Hibiscus Sabdariffa, which is commonly known as roselle or red sorrel in English.

Thursday, December 28, 2006

For New Year's, a Tradition or Two

A few years ago, I decided to ring in the New Year by undertaking every New Year’s Eve or New Year’s Day tradition I had ever heard of, along with whatever interesting customs I could find on the Web. It was a busy December 31st.

I was living in the southern U.S. at the time, so of course I had to prepare black-eyed peas (for good luck), greens (for money) and cornbread. I wasn’t (and am still not) certain how cornbread consumption might enhance my New Year, but it didn’t really matter, because what are beans and greens without a slab of cornbread? I hid a well-scrubbed coin inside the cornbread, for it seemed a country-spanning tradition (Greece, Norway) to hide things inside of holiday food – items which, happily, would bestow good luck upon whoever bit into them.

Although Chinese New Year falls at a different time of year, I adopted its traditions, too – giving my husband a red envelope filled with coins and sweeping dirt into piles, then carrying the dirt out of my house through the back door. Like Spaniards, my friends and I ate 12 grapes in rapid succession as the clock struck midnight, while trying, with limited success, to simultaneously sing Auld Lang Syne, kiss our significant others and make a champagne toast. I really wanted to attempt the Brazilian seaside custom of jumping seven waves while tossing flowers and making a wish, but it just wasn’t possible. It would have been nice, though, to know that the goddess of the sea would make my wish come true.

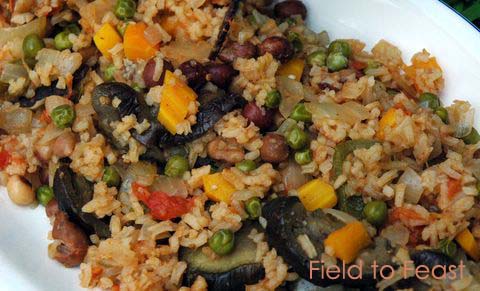
This year, I’m keeping it simple: I’ve cooked a vegetarian version of jolof rice that features black-eyed peas. This West African specialty also happens to be so flexible that I could say “out with the old, in with the new” to all the veggie odds and ends I had lying around. Okay, so preparing jolof rice didn’t help me sweep my house, but it did help me clean my fridge.

Jolof rice (also spelled “jollof” and “djolof”) can be made with meat, chicken, fish, or, like the recipe below, with simply vegetables and beans. You can be very creative with this dish, as long as your final product is spicy and the rice is dyed a reddish color from the use of a sufficient quantity of tomatoes. You could employ the exact same vegetables as I did, or you could add or substitute chopped green beans, cubes of butternut squash, shredded cabbage, or finely sliced scallions, for example. Jolof rice is well-complimented by a cool and refreshing side dish, such as a cucumber salad or mild mango salsa. Note that this recipe differs from more traditional versions in that it requires baking as a final step, which deftly melds the flavors together.

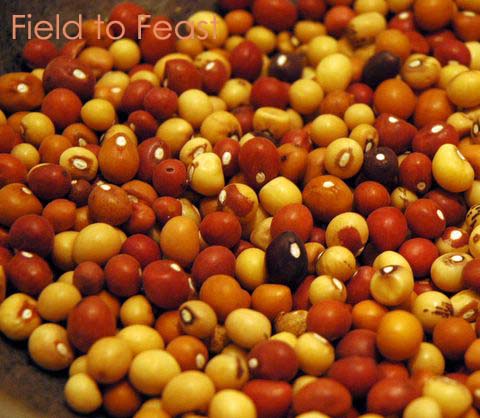
Another note: You might have trouble spotting the black-eyed peas in my photo. That’s because I used Zimbabwe’s version of the black-eyed pea, which is called the nyemba bean. (For those regular readers with good memories, yes – it is the leaves of this bean plant that are dried to make mufushwa.) Dried nyemba beans range in color from mustard yellow to brown to black and they all sport the trademark white “eye.” A handful of nyemba is a colorful sight. Sadly, however, every nyemba bean turns the same, dingy brown color when cooked, which caused them to disappear into my jolof rice, just when I wanted them to take center stage. Here’s a toast to hoping the nyemba beans will still provide me (and you!) with lots of good luck in 2007. Happy New Year!

West African Jolof Rice
Adapted from Vegetarian Times Complete Cookbook
Serves 6-8 as a main dish

1 cup dried black-eyed peas
2 medium eggplants, sliced into ½-inch / 12-millimeter rounds
2 teaspoons salt
1½ tablespoons vegetable oil
1 cinnamon stick
2 large onions, chopped
2 tablespoons fres
h ginger, minced
2-3 green chilies, seeded and chopped*
2 cloves garlic, minced
1 green bell pepper,
chopped
5 large tomatoes, peeled and chopped
1½ tablespoons tomato paste
2 teaspoons cayenne pepper
2 teaspoons hot c
urry powder (or mild, if you prefer)
1 pound / 450 grams carrots, chopped
1½ cups uncooked rice, preferably long-grained
1½ cups green peas (fresh, or frozen and defrosted)
Salt and freshly ground black pepper, to taste
Hot sauce, optional

Soak the black-eyed peas overnight in plenty of water. Drain, and put the black-eyed peas in a large saucepan with 2 quarts / 1 liter of fresh water. Bring to a boil, and then turn the heat down so that the black-eyed peas are simmering. Simmer for 45 minutes to 1 hour, or until the beans are tender. Drain and rinse the black-eyed peas, reserving their cooking water.

Place the eggplants slices in a colander and sprinkle 1 teaspoon of salt over them. Toss the slices with your hands to distribute the salt. Leave the eggplants to “drain” for at least five minutes. Pat them with a paper towel to remove any moisture that has seeped out.

Heat the vegetable oil in a large, wide saucepan over medium heat. When the oil is hot, add the cinnamon stick and let it sizzle for a few seconds. Add the eggplants, one tablespoon of the onion, one tablespoon of the ginger, one of the chilies, one clove of garlic and the bell pepper. Cook, stirring frequently, for 5-10 minutes until the eggplants have turned a reddish-brown. Remove the eggplants from the pot, and set them aside.

Add the remaining onion, ginger, chili, garlic and 1 teaspoon salt to the pot, along with the reserved liquid from cooking the black-eyed peas (there should be at least 3 cups or so). Also add the tomatoes, tomato paste, cayenne pepper and hot curry powder. Stir. Bring to a simmer and cook for 10 minutes. Meanwhile, pre-heat your oven to 400°F / 205°C.

Add the black-eyed peas, carrots and rice to the pot, and stir. Cook for five minutes. Then add the green peas and eggplant slices. Stir, and cook for 15 minutes more. Test the seasoning, adding salt and freshly ground black pepper as needed. Remove the cinnamon stick.

Transfer the mixture to a large, ovenproof casserole dish. Cover the dish with aluminium foil and bake for 25 minutes. Serve hot, with a squirt of the optional hot sauce, if desired. I like to use a spicy sweet chili sauce called “hot zvakananka sauce” (“zvakanaka” means “good” in Shona), which is locally made by Peter Piper’s.

*The original recipe calls for roasted chilies, but I’m not convinced the extra work roasting the chilies is worth it.

Saturday, November 18, 2006

Time for Avocado and Peanut Salad, Courtesy of Côte d'Ivoire

Time is a funny thing. On some occasions it evaporates, like when you are absorbed in a good book on a chilly day, a cup of tea by your side. Other days it’s cordoned off into neat and tidy chunks: meeting from 8-10; article due by noon; dentist appointment at 12; lunch with friends between 1 and 2. Once in awhile, time is thick, like quicksand, determined to prevent all forward movement, as when waiting in a never-ending queue, or during the last workday minutes of a Friday afternoon. Some of the longest hours of my life were spent on a street corner in Brisbane where I had the dastardly job of handing out advertisements for a chain of parking lots, all in clear view of the slowest moving clock I have ever seen, perched on top of the Suncorp tower.

Time can be heralded with the jingle of an on-the-hour news break, a school bell or the call from a mosque. It can also stretch before you, long and languid, like an endless white-sand beach, with nothing to mark its passing but the movement of the sun. And every so often you want to push the fast forward button on time, or, like TiVo, save the bit that you have now, but would find much more enjoyable later.

I realize, however, that despite these varied experiences of time and our casual use of expressions such as “time flies” or “time stood still,” it is not time itself that keeps changing its character, but we who are changing and living time in different ways. I was thinking these thoughts about time today, as I counted down the hours before Mark and I leave on our trip to Zanzibar. I always get a bit anxious before traveling, especially when this travel involves Zimbabwe’s less-than-reliable national air carrier. But, I’ve decided, my anxiety also stems from my conflicting feelings towards time. On one hand I want time to speed up – to be on that plane and in the air. On the other hand, I want time to slow down, so that I have the chance to pack leisurely, to tie up loose ends, and, of course, to write a post before my weeklong blog hiatus.

The puzzle is, what can I cook that is quick and easy, and doesn’t create leftovers I won’t have the opportunity to eat? The answer is this refreshing avocado and peanut salad from Côte d'Ivoire. Its appeal stems from the ingredients’ contrasting flavors (sweet, spicy and sour) and textures (creamy and crunchy). Now, I have no aversion to simply slicing open an avocado and eating it straight from the peel. But, with a just a few more minutes on my hands, the extra effort to make this salad is well worth it. One day – maybe as an antidote to the tedium of packing or the anxiety of time – you, too, can give it a try.

Avocado Salad with Crunchy Peanut Topping
Adapted from Food by Country
Serves 4-6

3 ripe avocados
2 tablespoons fresh lemon juice
3 tablespoons finely chopped peanuts (a.k.a. groundnuts)
¾ teaspoon paprika
¾ teaspoon ground cinnamon
Cayenne pepper, to taste
Salt, to taste

Peel the avocados and cut the flesh into cubes. Place the cubes in a small bowl, and toss with the lemon juice. In a separate bowl, mix together the peanuts, paprika, ground cinnamon, cayenne paper and salt. Spoon the avocado onto your serving plate, and top with a sprinkling of the peanuts. Serve immediately.

This post is an entry in Slashfood's Going Nuts in November food blog event.

Saturday, October 21, 2006

From Nigeria: A Fish Stew

Last December I spent 10 days eating (and working) in Abuja, Nigeria. I discovered that Nigerian food can be quite spicy, and that fish of one kind or another seems to sneak its way into most meals, even a serving a greens. I ate many things I didn’t like and a few I did.

By the end of the trip, I had identified several favorite dishes. First, there was moin-moin – a steamed cake of ground legumes studded with tiny fish and hard-boiled egg, and dyed a lovely rose color from the use of palm oil. I’d usually order moin-moin with a side of dodo, which are fried plantains similar to the ones you’d eat at a Cuban restaurant. I also enjoyed a wide variety of fish stews and soups.

The recipe below creates a fish stew that is rich and comforting – a simple, flavorful dinner on a chilly night. You should use a firm white fish for this dish. We used bream (a.k.a. tilapia), a fish found in Lake Kariba on the border between Zimbabwe and Zambia.

Nigerian Fish Stew
Adapted from Food by Country and Motherland Nigeria

Serves 4

1.2 pounds / 500 grams fish fillets
2 teaspoons salt, or more, to taste
1 tablespoon dried thyme, or more, to taste
1 small red bell pepper, chopped
1 small green chili, minced
1 small onion, chopped
½ cup tomato paste
2 cups vegetable broth
3 tablespoons vegetable oil (palm oil, if you have it)
Salt and black pepper, to taste

Season the fish fillets with salt and thyme, and set aside. Place the red pepper, chili, onion, tomato paste and broth in a medium saucepan over medium heat. Bring to a simmer, and cook for 10 minutes. Add the oil and turn the heat down to low. Cook for 15 minutes. Slice the fish into ¾ -inch strips, and add them to the pot. Simmer for 10 minutes more. Add salt and pepper to taste, and serve the stew over rice.