 A few years ago, I decided to ring in the New Year by undertaking every New Year’s Eve or New Year’s Day tradition I had ever heard of, along with whatever interesting customs I could find on the Web. It was a busy December 31st.
 I was living in the southern U.S. at the time, so of course I had to prepare black-eyed peas (for good luck), greens (for money) and cornbread. I wasn’t (and am still not) certain how cornbread consumption might enhance my New Year, but it didn’t really matter, because what are beans and greens without a slab of cornbread? I hid a well-scrubbed coin inside the cornbread, for it seemed a country-spanning tradition (Greece, Norway) to hide things inside of holiday food – items which, happily, would bestow good luck upon whoever bit into them.
Although Chinese New Year falls at a different time of year, I adopted its traditions, too – giving my husband a red envelope filled with coins and sweeping dirt into piles, then carrying the dirt out of my house through the back door. Like Spaniards, my friends and I ate 12 grapes in rapid succession as the clock struck midnight, while trying, with limited success, to simultaneously sing Auld Lang Syne, kiss our significant others and make a champagne toast. I really wanted to attempt the Brazilian seaside custom of jumping seven waves while tossing flowers and making a wish, but it just wasn’t possible. It would have been nice, though, to know that the goddess of the sea would make my wish come true.
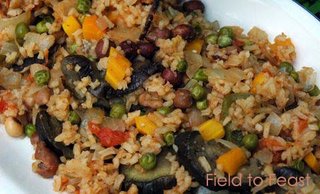
This year, I’m keeping it simple: I’ve cooked a vegetarian version of jolof rice that features black-eyed peas. This West African specialty also happens to be so flexible that I could say “out with the old, in with the new” to all the veggie odds and ends I had lying around. Okay, so preparing jolof rice didn’t help me sweep my house, but it did help me clean my fridge.
Jolof rice (also spelled “jollof” and “djolof”) can be made with meat, chicken, fish, or, like the recipe below, with simply vegetables and beans. You can be very creative with this dish, as long as your final product is spicy and the rice is dyed a reddish color from the use of a sufficient quantity of tomatoes. You could employ the exact same vegetables as I did, or you could add or substitute chopped green beans, cubes of butternut squash, shredded cabbage, or finely sliced scallions, for example. Jolof rice is well-complimented by a cool and refreshing side dish, such as a cucumber salad or mild mango salsa. Note that this recipe differs from more traditional versions in that it requires baking as a final step, which deftly melds the flavors together.
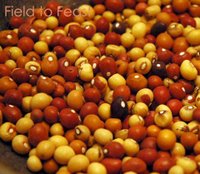
 Another note: You might have trouble spotting the black-eyed peas in my photo. That’s because I used Zimbabwe’s version of the black-eyed pea, which is called the nyemba bean. (For those regular readers with good memories, yes – it is the leaves of this bean plant that are dried to make mufushwa.) Dried nyemba beans range in color from mustard yellow to brown to black and they all sport the trademark white “eye.” A handful of nyemba is a colorful sight. Sadly, however, every nyemba bean turns the same, dingy brown color when cooked, which caused them to disappear into my jolof rice, just when I wanted them to take center stage. Here’s a toast to hoping the nyemba beans will still provide me (and you!) with lots of good luck in 2007. Happy New Year!
West African Jolof Rice
Adapted from Vegetarian Times Complete Cookbook
Serves 6-8 as a main dish
1 cup dried black-eyed peas
2 medium eggplants, sliced into ½-inch / 12-millimeter rounds
2 teaspoons salt
1½ tablespoons vegetable oil
1 cinnamon stick
2 large onions, chopped
2 tablespoons fresh ginger, minced
2-3 green chilies, seeded and chopped*
2 cloves garlic, minced
1 green bell pepper, chopped
5 large tomatoes, peeled and chopped
1½ tablespoons tomato paste
2 teaspoons cayenne pepper
2 teaspoons hot curry powder (or mild, if you prefer)
1 pound / 450 grams carrots, chopped
1½ cups uncooked rice, preferably long-grained
1½ cups green peas (fresh, or frozen and defrosted)
Salt and freshly ground black pepper, to taste
Hot sauce, optional
Soak the black-eyed peas overnight in plenty of water. Drain, and put the black-eyed peas in a large saucepan with 2 quarts / 1 liter of fresh water. Bring to a boil, and then turn the heat down so that the black-eyed peas are simmering. Simmer for 45 minutes to 1 hour, or until the beans are tender. Drain and rinse the black-eyed peas, reserving their cooking water.
Place the eggplants slices in a colander and sprinkle 1 teaspoon of salt over them. Toss the slices with your hands to distribute the salt. Leave the eggplants to “drain” for at least five minutes. Pat them with a paper towel to remove any moisture that has seeped out.
Heat the vegetable oil in a large, wide saucepan over medium heat. When the oil is hot, add the cinnamon stick and let it sizzle for a few seconds. Add the eggplants, one tablespoon of the onion, one tablespoon of the ginger, one of the chilies, one clove of garlic and the bell pepper. Cook, stirring frequently, for 5-10 minutes until the eggplants have turned a reddish-brown. Remove the eggplants from the pot, and set them aside.
Add the remaining onion, ginger, chili, garlic and 1 teaspoon salt to the pot, along with the reserved liquid from cooking the black-eyed peas (there should be at least 3 cups or so). Also add the tomatoes, tomato paste, cayenne pepper and hot curry powder. Stir. Bring to a simmer and cook for 10 minutes. Meanwhile, pre-heat your oven to 400°F / 205°C.
Add the black-eyed peas, carrots and rice to the pot, and stir. Cook for five minutes. Then add the green peas and eggplant slices. Stir, and cook for 15 minutes more. Test the seasoning, adding salt and freshly ground black pepper as needed. Remove the cinnamon stick.
Transfer the mixture to a large, ovenproof casserole dish. Cover the dish with aluminium foil and bake for 25 minutes. Serve hot, with a squirt of the optional hot sauce, if desired. I like to use a spicy sweet chili sauce called “hot zvakananka sauce” (“zvakanaka” means “good” in Shona), which is locally made by Peter Piper’s.
*The original recipe calls for roasted chilies, but I’m not convinced the extra work roasting the chilies is worth it.
 A few years ago, I decided to ring in the New Year by undertaking every New Year’s Eve or New Year’s Day tradition I had ever heard of, along with whatever interesting customs I could find on the Web. It was a busy December 31st.
  Another note: You might have trouble spotting the black-eyed peas in my photo. That’s because I used


